Why Isn’t My Lipstick Plant Flowering?
Kim Marson
Gardening WriterKim is passionate about helping people create beautiful, healthy indoor spaces that are filled with plants. Kim believes that plants make us happier, healthier human...
- Watering Matters: One of the primary reasons your lipstick plant may not be flowering is improper watering. Both overwatering and underwatering can stress the plant, hindering its ability to produce blooms.
- Light Conditions Are Crucial: The article emphasizes the importance of providing your lipstick plant with the right amount of light. Too much direct sunlight can scorch the leaves, while too little light can prevent flowering altogether.
- Fertilization Is a Balancing Act: The article points out that using the wrong type or amount of fertilizer can negatively impact your lipstick plant's health and its ability to flower. It recommends a balanced, water-soluble fertilizer for optimal results.
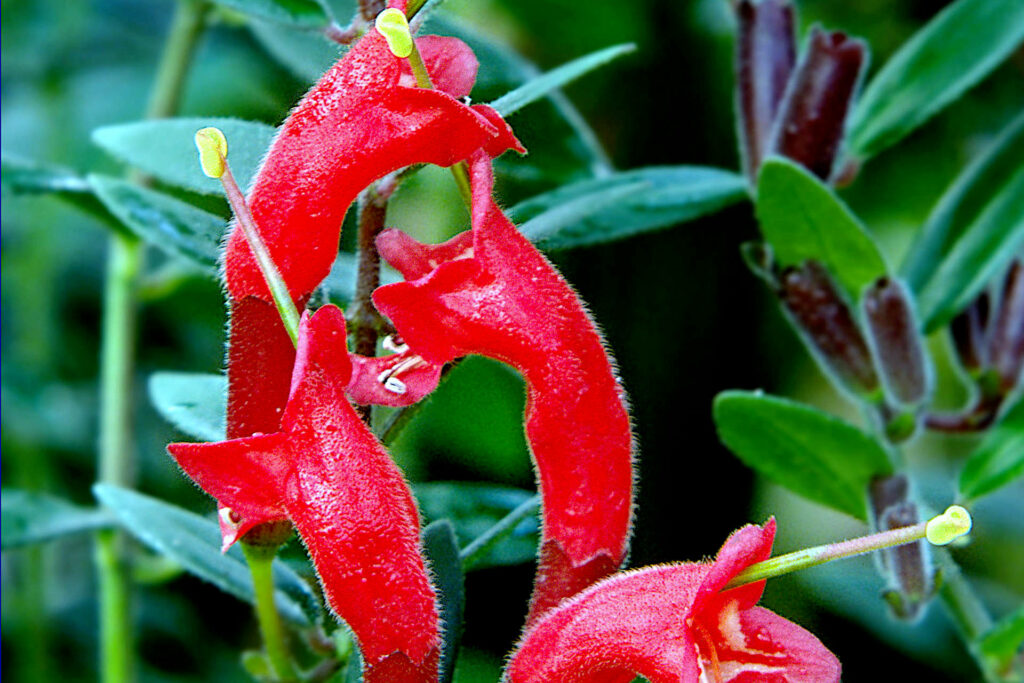
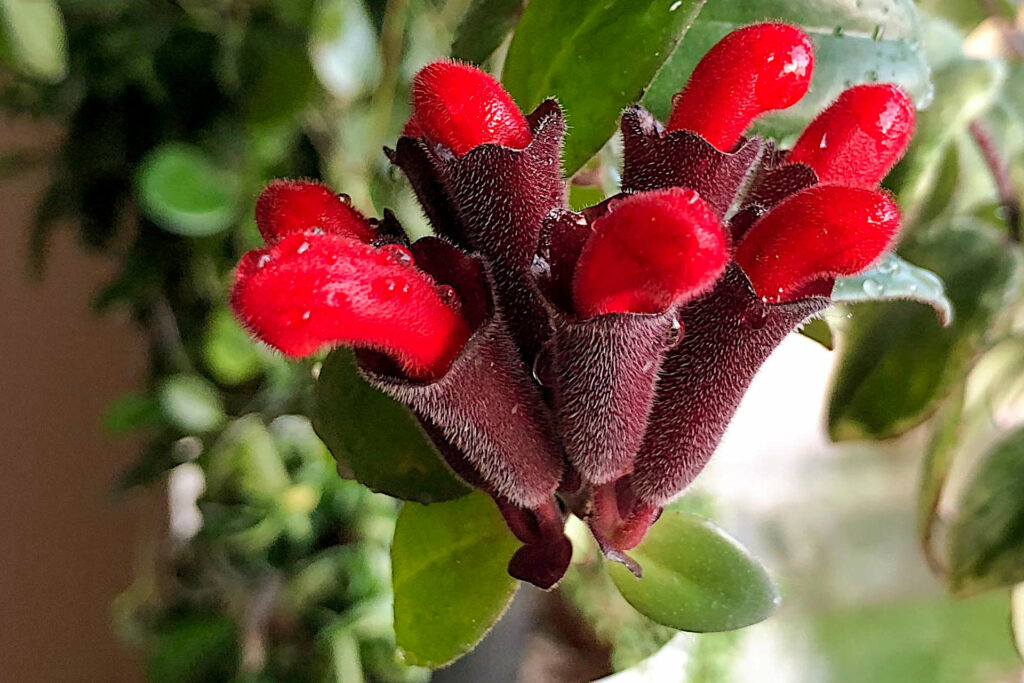
Many lipstick plant (Aeschynanthus species) owners struggle to get their plants to flower consistently indoors and are consequently often asked why isn't flowering. As a houseplant, the lipstick plant is admired for its colorful blooms that resemble tubes of lipstick. This can be frustrating.
When it boils down to it, there are several key factors that influence lipstick plant flowering. The principal causes tend to include light, watering, and temperature, to name but three, but there are several others that also need to be considered.
Below, you'll discover the top five reasons your variety of lipstick plant might not be flowering and how to address them and examine the cultivation conditions lipstick plants need to bloom abundantly indoors. Follow these tips to enjoy the unique flowers of this popular houseplant.
Understanding the Blooming Cycle of Your Lipstick Plant
The blooming cycle of a lipstick plant is a fascinating journey that every plant owner should understand. Knowing the growth stages and seasonal changes can help you identify why your plant might not be flowering. For instance, if your plant is in a vegetative stage, don't expect blooms just yet. Timing your care routines according to these stages can make all the difference.
Understanding Growth Stages
Your lipstick plant will go through various growth stages, each with its own set of care requirements. Knowing what each stage entails can help you adjust your care routine, ensuring that the plant remains healthy and ready to flower when the time is right.
Addressing Flowering Issues
Flowering issues can be a real concern for any plant owner. From environmental factors to nutrient deficiency, various elements could be at play. Knowing these can help you take corrective measures, ensuring that your lipstick plant blooms beautifully.
The Principle Causes of Non-Blooming Lipstick Plants
| Factors | Possible Causes |
|---|---|
| Light | Insufficient bright, indirect light |
| Watering | Overwatering or underwatering |
| Temperature | Cooler temperatures inhibiting flowering |
| Humidity | Low humidity or lack of misting |
| Fertilizer | Lack of regular fertilization |
| Pruning | Improper timing of pruning or lack of pruning |
| Repotting | Not becoming rootbound before repotting |
| Pests & diseases | Presence of pests or diseases |
Ensure Adequate Bright, Indirect Light
Light exposure is a critical environmental factor that directly influences flowering. Providing sufficient bright, indirect light is crucial for getting lipstick plants to flower. In their native tropical habitats, these plants grow in forest understories where they receive dappled sunlight filtering through the canopy.
Too little light can result in weak stems and poor flowering, while too much can cause leaf burn. Recreating similarly bright, indirect light indoors encourages blooming, so aim for bright, indirect light to encourage a healthy blooming cycle.
Lighting Requirements
- Lipstick plants require very high light levels to flower properly. They need 12-14 hours of bright, indirect sunlight daily.
- East or west-facing windows are ideal to provide plenty of gentle morning or evening sun.
- South-facing windows work if protected with sheers or a light curtain to filter the intense direct light.
- North-facing windows generally don’t provide enough light intensity. Supplement with grow lights.
- Artificial lighting, like LED or fluorescent plant lights, can also provide sufficient brightness when natural light is limited. Use lights that provide around 3000-5000 lumens per square foot. Position lights 6-12 inches above the plant and run 14-16 hours daily.
Signs of Insufficient Light
Some signs that your lipstick plant isn't getting enough sun:
- Lack of flowering or very sparse flowers
- Smaller leaves
- Leaves turning darker green
- Long, leggy growth leaning toward the light source
If your plant displays these symptoms, gradually move it to a brighter location over 7-10 days to acclimate it. Adding a grow light nearby can also boost the brightness.
Maximizing Light Exposure
Use these tips to maximize the light exposure for your lipstick plant:
- Keep the plant near the window in the brightest location.
- Rotate the pot weekly so all sides get even lighting.
- Prune back or trim any overly long vines that become leggy from reaching for the light.
- Clean windows and wipe leaves regularly to maximize light capture.
- Use white or reflective curtains to bounce more light onto plants.
- Add mirrors or other reflective surfaces nearby to amplify brightness.
- Supplement with grow lights if needed.
Getting the lighting right is crucial for lipstick plants. Provide very bright, indirect light to satisfy their high demand and encourage prolific flowering.
The Ideal Watering Schedule
Overwatering or underwatering can lead to root rot and nutrient deficiency, respectively. Establishing a consistent watering schedule based on the plant's growth stages can significantly improve its overall health and flowering potential.
Allow Soil to Dry Between Waterings
Lipstick plants do best when you allow the soil to dry out slightly between waterings. Too much moisture can lead to root rot and other problems.
Watering Best Practices
- Allow the top 1-2 inches of soil to dry out before watering again.
- Check the soil moisture by sticking your finger into the pot to test.
- The plant needs watering when the soil feels dry to the touch.
- Overwatering is worse than underwatering for lipstick plants. Err on the side of less frequent watering.
- Water thoroughly until it drains freely from the drainage holes when you do water.
- Always empty any water that collects in the saucer to prevent reabsorption.
- Water less frequently in the winter when growth slows.
Signs of Overwatering
- Wilting or drooping leaves
- Leaves turning yellow
- Soft, mushy stems
- Root rot - roots turn brown or black
If you notice these signs, allow the soil to dry out completely before watering again. Remove any dead or dying foliage, and don't water again until the top several inches of soil become dry.
Signs of Underwatering
- Dry, shriveled leaves
- Wilt that doesn't recover after watering
- Soil pulls away from edges of the pot
- Stunted new growth
Increase water gradually if you notice these issues until the plant recovers.
Tips for Proper Watering
- Water in the morning, so leaves dry quickly.
- Use room temperature filtered water for best results.
- Add gravel or pebbles to the saucer under the pot to prevent standing water.
- Use a well-draining potting mix, not soil from the garden.
- Stick your finger in the top few inches of soil to gauge moisture.
- Lift the pot - lightweight means it's time to water.
Adequate water without oversaturation is key for a flowering lipstick plant. Allow the soil to dry out some before thoroughly watering again. Proper moisture keeps plants healthy and encourages prolific blooms.
Fertilize Regularly
Providing adequate fertilizer is essential for fuelling growth and flowering in lipstick plants. Fertilizing on a regular schedule gives your plant a consistent supply of essential nutrients.
The Right Fertilizer Ratio
Fertilizers are not created equal. A balanced fertilizer ratio ensures that your lipstick plant receives all the nutrients it needs. Too much nitrogen, for example, can lead to lush foliage but poor flowering.
- Use a balanced houseplant fertilizer that provides an even ratio of nitrogen (N), phosphorus (P), and potassium (K).
- Look for ratios like 20-20-20 or 10-10-10 on the label.
- Options include:
- Liquid fertilizers - easy to mix into your watering can and apply.
- Granular or powder types - sprinkle onto the soil.
- Time-release pellets - longer-lasting fertilization.
- Organic or chemical fertilizers both work well.
Fertilizing Schedule
- Fertilize lipstick plants every 2-4 weeks during the active growing season (spring through summer).
- In fall and winter, fertilize once a month since growth slows.
- Always dilute liquid fertilizers to 1/2 or 1/4 strength to avoid burn.
- Apply fertilizer with regular watering to wash it into the soil.
- Increase frequency if your plant shows signs of nutrient deficiency.
Signs of Nutrient Deficiency
- Smaller leaves
- Pale yellowing leaves
- Weak, stunted growth
- Lack of flowering
Boost fertilizer concentrations or frequency if you notice these signs.
Application Tips
- Mix liquid fertilizers into your watering can and apply with normal watering.
- For granular types, sprinkle evenly over the soil surface.
- Move the plant to the sink or tub when fertilizing to avoid stains.
- Always follow label directions for amounts and dilute as needed.
- Apply fertilizer in the morning.
- Wash fertilizer off foliage after application to avoid leaf burn.
With regular feeding every 2-4 weeks, your lipstick plant will have the nutrition it needs to support lush growth and abundant blooms. Proper fertilization encourages flowering and vigor.
Provide Warm Temperatures
Just like humans, plants have a comfort zone when it comes to temperature. Extreme temperatures can stress your lipstick plant, affecting its blooming cycle. Keep your plant in a stable temperature range to encourage healthy growth and flowering.
Ideal Temperature Range
Lipstick plants thrive in warm conditions between 70-80°F and require consistent temperatures in this range to flower properly. Cooler temps can inhibit blooming.
- The ideal temperature range for lipstick plants is 70-80°F during the day.
- At night, temperatures between 60-70°F are recommended.
- Maintain the daytime highs and nighttime lows within these ranges for the best growth.
- Temperatures lower than 60°F or higher than 80°F can prevent flowering.
Providing Warmth
- Place lipstick plants away from drafty windows or doors.
- Avoid setting them near air vents blowing cold air.
- Move plants to warmer rooms in winter if needed.
- Use grow lights to provide warmth as well as light.
- A space heater or heating mat can maintain temperatures.
- Insulate window panes to prevent cold from radiating in.
Signs of Cold Stress
If temperatures are too low, you may notice:
- Leaf drop
- Curling or purpling leaves
- Leggy, drawn-out growth
- Lack of new growth
- Failure to flower
Try moving the plant to a warmer area if you see these issues.
Coping With Heat
Lipstick plants can tolerate high temperatures above 80°F, but growth may slow. Use these tips to help them cope:
- Provide ample water and humidity.
- Mist leaves frequently.
- Use sheer curtains to filter intense light from sunny windows.
- Move plants away from hot window exposures if needed.
- Use evaporative coolers or fans to circulate the air.
Adequate warmth between 70-80°F and avoiding cold drafts is key for prolific flowering in lipstick plants. Monitor conditions and make adjustments to maintain an optimal temperature range.
The Importance of Humidity Levels
Humidity is often an overlooked aspect of plant care, yet it's crucial for the well-being of your lipstick plant. Low humidity levels can lead to dry soil and leaves, which in turn can cause flowering issues. On the flip side, high humidity can encourage root rot. A balanced environment is key; consider using a humidity tray or room humidifier to maintain optimal conditions.
Adding Moisture to the Air
Here are some effective ways to boost humidity for your lipstick plant:
- Mist the plant daily using a spray bottle of room-temperature water. Aim for the leaves.
- Use a pebble tray - place the pot on a tray filled with LECA pebbles and water to provide humidity. The evaporating water humidifies the air.
- Run a humidifier in the room during dry seasons like winter.
- Place pots together to create a humidity tray - groups of plants increase moisture in the air.
- Set the pot on a wet towel to create a moisture source beneath.
- Fill the sink or tub with warm water and set the plant nearby. The ambient humidity will increase.
Signs of Low Humidity
If the air is too dry, you may notice:
- Leaf tip browning
- Curled or crispy leaves
- Lackluster foliage
- Dry soil
- Failure to flower
Ramp up the humidity if you see these signs using the methods above.
Ideal Humidity Range
- Lipstick plants thrive when humidity is 60-80%.
- Measure with a hygrometer to monitor the actual level.
- Boost humidity closer to 80% during dry winter months when heating systems run.
- Humidity above 50% is sufficient during warmer seasons.
Avoiding Problems
With the added moisture, it also provides good air circulation and grows in well-draining soil to prevent issues like:
- Mold or fungus on leaves and soil
- Rotting stems and roots
- Pest infestations
Find the right balance between humidity and proper airflow to maintain a healthy, flowering lipstick plant.
Allow Plant to Become Rootbound
Allowing your lipstick plant to become moderately rootbound before repotting encourages flowering. Restricted roots promote blooming.
What is Rootbound?
A rootbound plant has filled its pot with roots to the point they have little room to grow further. You can tell a plant is rootbound by these signs:
- Roots growing out of the drainage holes
- Roots tightly packed against the inside of the pot
- Poor drainage
- Stunted growth
Mild to moderate rootbound conditions are beneficial for flowering in lipstick plants. But severely tangled and congested roots will need to be addressed.
Encouraging Rootbound Growth
Use these tips to promote root restriction in your lipstick plant:
- Avoid repotting yearly. Repot every 2-3 years once rootbound.
- Select a pot only 1-2 inches larger when you do repot.
- Prune away any large roots that circle the outside of the root ball.
- Use a well-draining soil mix so roots don't sit in wet soil.
- Allow the soil to dry adequately between waterings.
Signs It's Time to Repot
Repot into a slightly larger pot if you notice:
- Severely stunted growth and small leaves
- Soil staying soggy after watering
- Roots badly circled on the surface
- Yellow, unhealthy lower leaves
Even when rootbound, plants will grow new roots from the tip each year. But severely bound plants struggle to uptake water and nutrients.
Transition After Repotting
- Gently loosen some of the tightly packed roots when repotting.
- Prune any badly circled roots.
- Allow the plant to recover in shaded light for 1-2 weeks.
- Resume normal care when new growth appears.
Avoid frequent repotting to let plants become moderately rootbound and promote abundant blooms.
Choosing the Right Soil Type

Soil type is more than just dirt; it's the foundation of your plant's health. A well-draining soil can prevent root rot and ensure proper nutrient absorption. If your lipstick plant is not flowering, consider testing your soil type. Nutrient deficiency often starts at the root, quite literally.
Importance of pH Levels
Soil pH levels can significantly affect nutrient absorption. If your plant is not flowering, consider testing the soil's pH. Adjusting it to the ideal range can improve nutrient uptake and, consequently, flowering.
Soil Ingredients to Use
Choose a potting mix with these ingredients:
- Perlite or pumice - Lightens the texture and improves drainage. Look for at least 20-30% in the mix.
- Peat or coir - Helps retain some moisture while still draining well.
- Compost or bark - Adds organic matter. Opt for compost designed for containers, not garden soil.
- Sand or gravel - Increases drainage and aeration in heavy mixes.
Avoid soilless mediums like sphagnum moss that stay too wet.
Soil Mix Recipes
- 1 part peat: 1 part perlite - A simple, lightweight blend.
- 2 parts potting soil: 1 part perlite: 1 part orchid bark - With added bark for aeration.
- 2 parts potting mix: 1 part pumice - With extra pumice to create pores for drainage.
You can make your own mix or use a quality, commercial blend formulated for containers.
Checking Drainage
Test drainage before using any potting mix:
- Add water to a sample of the dry soil in a jar or bucket.
- It should drain freely and not become soggy or waterlogged.
- The excess water should drain out the bottom within a few minutes.
- If it stays saturated, add more perlite, gravel or bark to improve drainage.
Avoiding Poor Drainage
Dense, clay-like soil can lead to:
- Soggy soil that suffocates roots
- Fungal diseases like root rot
- Nutrient deficiencies
- Smaller leaves and stunted growth
- Lack of flowering
Use a fast-draining mix and avoid heavy garden soil to keep your lipstick plant healthy.
Recognizing and Treating Root Rot
Root rot is a silent killer that can severely affect your plant's ability to flower. If you notice a musty smell or see blackened roots, take immediate action. Root rot can not only halt the blooming cycle but also lead to the death of the plant. Consider repotting into fresh soil and cutting away the affected roots.
Prune Only After Flowering
Pruning lipstick plants at the right time is key to avoiding the removal of developing flower buds. Prune only after flowering since the blooms emerge on old wood.
Where Flower Buds Develop
- Lipstick plant flower buds form on stems produced during the previous growing season.
- The buds then open into flowers during the current bloom period.
- Pruning away last year's growth unintentionally eliminates the emerging buds.
When to Prune
- Wait to prune lipstick plants until after the flowering period ends.
- In spring and summer, blooms slow down or cease by mid to late summer.
- This is the time to trim your plant, around August-September.
- Remove old flowering stems back to a healthy leaf node.
Pruning Before Flowering
- If you prune in late winter or early spring before flowers emerge, you'll be cutting off the potential buds.
- Your plant likely won't bloom that year if pruned too early.
Shaping and Maintenance Pruning
- You can prune for shaping and size control after flowering.
- Trim off unwanted, congested growth and cut back lanky stems.
- Remove any dead or damaged foliage and stems.
- This maintains a compact, shapely plant.
Pinching Tips
- Instead of shearing the plant, do light pinching to shape growth.
- Use your fingers to pinch off the soft shoot tips on branches.
- This encourages bushier, fuller growth.
Proper timing when pruning lipstick plants is critical. Resist the urge to trim early and wait until after the flowering period ends to avoid losing flower buds.
Check for Pests and Diseases
Keeping your lipstick plant free from pests and diseases ensures it remains healthy and able to produce abundant flowers. Inspect regularly and address any issues promptly.
Common Pests
Lipstick plants can be affected by:
- Aphids - Small, green or black soft-bodied insects that cluster on new growth.
- Thrips - Tiny black or yellow insects that feed on leaves and buds.
- Mealybugs - Fluffy white pests that attach to stems and leaves.
- Spider mites - Tiny red or green mites that form webs on foliage.
Check the undersides of leaves, along stems, and at the bases of leaf nodes for pests. Catch infestations early before they spread.
Treating Pests
- Wash pests off with a strong spray of water.
- Insecticidal soap, neem oil, or horticultural oil sprays help manage most soft-bodied insects.
- Apply to all leaf surfaces according to label directions.
- For severe infestations, use a systemic pesticide as a last resort.
Preventing Pests
- Keep plants healthy through proper care and growing conditions.
- Quarantine new plants before introducing them.
- Remove any infected parts immediately to avoid spread.
- Keep garden areas and tools clean.
Common Diseases
Watch for these diseases:
- Botrytis - Grey mold on flowers, leaves or stems in humid conditions.
- Leaf spots - Small brown lesions on foliage.
- Root rot - Blackened, mushy roots from overwatering.
Treating Diseases
- Improve air circulation and reduce humidity.
- Remove infected plant parts.
- Apply a fungicide for serious outbreaks.
- Prevent by watering properly and keeping leaves dry.
Routine inspection and quick action against pests and diseases ensure your lipstick plant stays healthy and able to produce flowers.
The Effects of Pesticides
While pesticides can protect your plant from pests, they can also have adverse effects. Some pesticides can disrupt the blooming cycle or even harm the plant. Always opt for organic or plant-friendly options and follow the application guidelines carefully.
Final Thoughts: Why Isn't My Lipstick Plant Flowering
As we have seen, achieving consistent flowering from your lipstick plant requires providing it with optimal care. Getting your lighting right (good, indirect light), having a suitable watering regimen, and keeping the temperature and humidity at the correct levels are the main ways to ensure your lipstick plant blooms.
Of course, all the other elements we have discussed will also have an impact, so ultimately it boils down to caring for and nurturing your lipstick plant and not neglecting it, and you will you can provide the perfect conditions to enjoy abundant blooms from your lipstick plant. The unique tubular flowers are one of the benefits of owning a lipstick plant and will add beautiful color to your indoor space.
Videos
Resources
- American University of Beirut: Aeschynanthus radicans (Lipstick Plant, Basket Vine)
- Dong Il Kang: Flowering...Response to Quality and Intensity of Night Interruption Light
Kim is passionate about helping people create beautiful, healthy indoor spaces that are filled with plants. Kim believes that plants make us happier, healthier human beings, and she loves sharing her knowledge with others so they can experience the joys of plant care for themselves. <a href="https://plantcaresimplified.com/kim-marson/">Read more</a>
More Posts